Your kitchen faucet was fine yesterday. Today it sputters, sprays sideways, or drops to a weak trickle when you're trying to rinse dishes. That usually feels bigger than it is.
A lot of the time, the fix is sitting right at the tip of the faucet. The aerator is small, easy to ignore, and one of the most common reasons a kitchen faucet starts acting up. If you clean it the right way, you can often get your flow back in a few minutes. If that doesn't solve it, the faucet may be telling you about a deeper plumbing problem somewhere else in the house.
Is Your Kitchen Faucet Sputtering or Weak
You turn on the kitchen faucet to rinse a pan, and the stream spits, hisses, or shoots off at an angle. If the problem shows up at that faucet and nowhere else, the aerator is still the first place to look.
The aerator is the small threaded piece at the tip of the spout. It shapes the flow, softens the stream, and catches grit that comes through the line. Health Canada also notes that aerators should be cleaned regularly, and that heavier mineral buildup may need a vinegar soak while lighter buildup can come off with a shorter cleaning, according to its faucet aerator cleaning guidance.
In homes around Acworth, Woodstock, Marietta, and the rest of North Metro Atlanta, this is one of the most common kitchen faucet complaints I see. The faucet still runs, but the pattern changes first. It may sputter for a second, spray sideways, or lose enough force that washing dishes gets annoying fast. Kitchen faucets usually show the problem early because they get used hard every day.
A dirty aerator often causes:
- Weak flow at one faucet while the rest of the house seems fine
- Sputtering or uneven spray when part of the screen is blocked
- Extra splashing because the stream is no longer uniform
- A sudden change after plumbing work if sediment broke loose in the line
That said, a clogged aerator is not the only reason a faucet gets weak.
If both hot and cold sides have poor flow, if nearby fixtures are also acting up, or if pressure has been inconsistent around the house, step back and look at the bigger system. A failing valve, high or unstable pressure, sediment from older piping, or trouble at the service line can all show up first as a "bad faucet" complaint. If you have wider pressure issues, review these pressure reducing valve problems and home water pressure signs before assuming the faucet tip is the whole story.
That is the trade-off with this symptom. Sometimes you fix it in ten minutes at the sink. Sometimes that weak stream is the first warning of a larger issue, like buildup in the supply line, a problem that calls for drain cleaning after heavy sediment events, or even main water line repair.
Gathering Your Tools and Identifying Your Aerator
Before you twist anything off, get your tools together and look closely at the faucet tip. This part is quick, but it prevents scratched finishes and stripped parts.
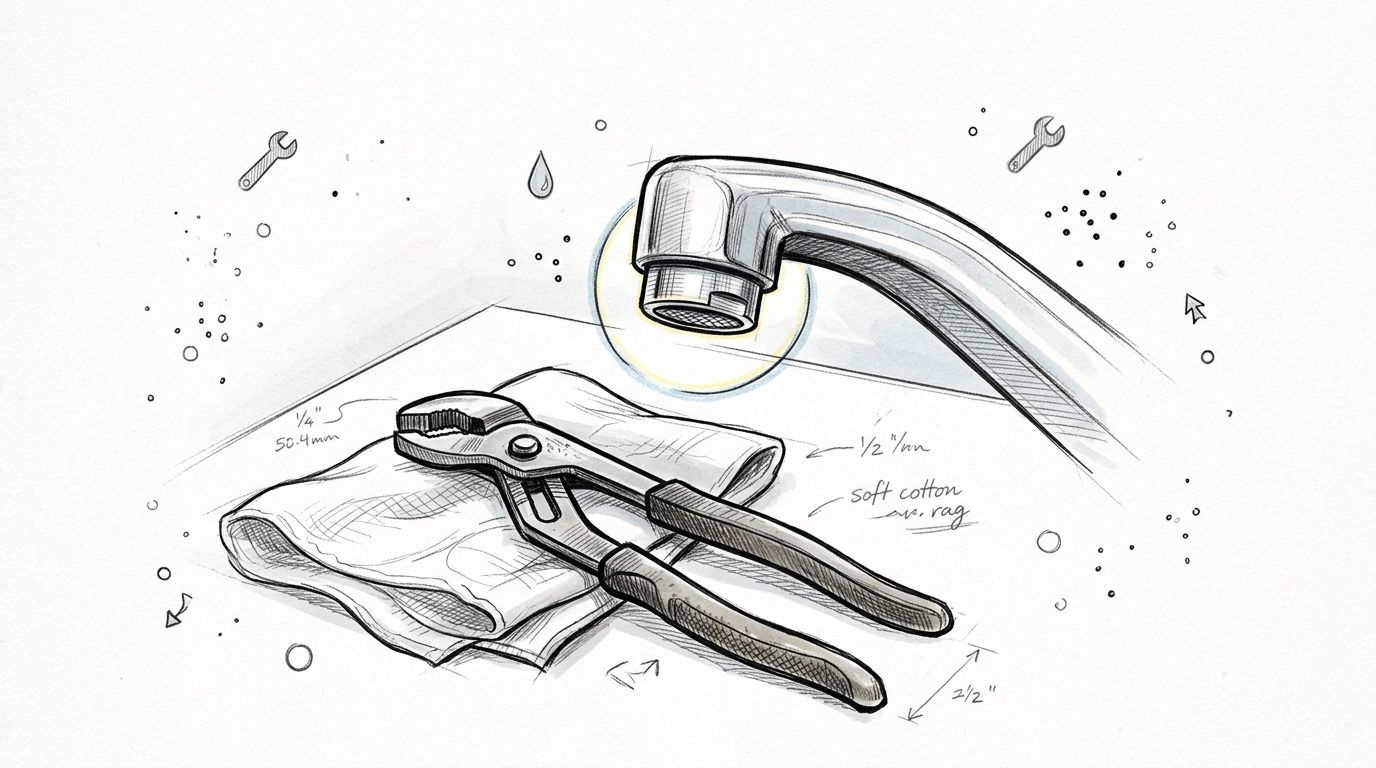
What to set on the counter
Most homeowners already have what they need:
- Adjustable pliers wrapped with a soft cloth or rag so the jaws don't scar the faucet
- A small bowl for soaking the aerator pieces
- White vinegar for loosening mineral scale
- A soft brush such as an old toothbrush
- A towel or rag to keep tiny parts from rolling into the sink
If you have needle-nose pliers, leave them out unless the faucet design absolutely requires them. They can slip and mark the finish fast.
How to tell what type you have
Some aerators are easy to spot. You can see the round metal tip with visible edges and threads. Those usually unscrew by hand or with padded pliers.
Others are recessed inside the spout and look almost hidden. Those often need a small aerator key that came with the faucet. If you have a newer kitchen faucet, especially a styled or pull-down model, don't force it with regular pliers until you're sure it isn't a hidden design.
A simple check helps:
| Aerator style | What it looks like | What to use |
|---|---|---|
| Standard threaded | Visible piece at the end of the spout | Hand first, then cloth-wrapped pliers |
| Recessed or hidden | Screen sits up inside the faucet tip | Aerator key |
Wrap metal tools before you touch the faucet. Most damage in a simple aerator job happens before cleaning even starts.
The Step-by-Step Guide to Cleaning Your Aerator
Once the tools are out, the job is mostly about patience. You don't need to muscle it. You need to remove the part carefully, keep the pieces in order, clean them gently, and flush the faucet before putting everything back.
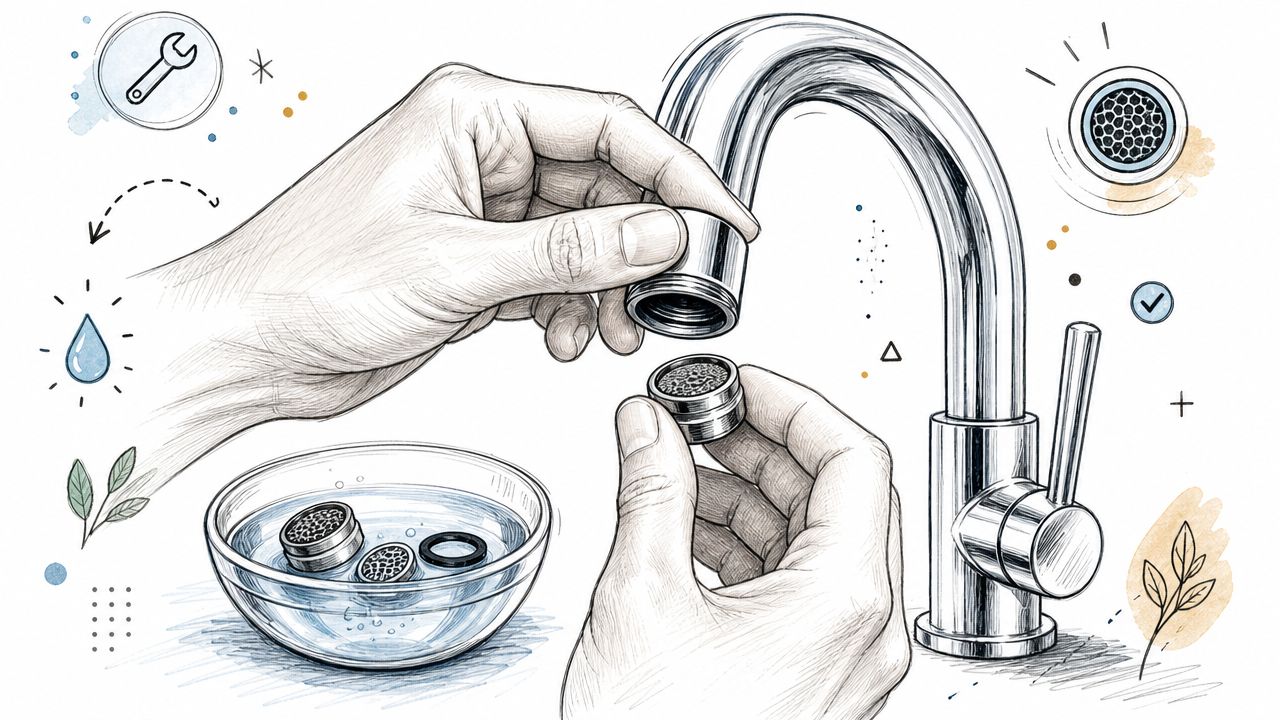
Start by removing it without damaging the finish
Try unscrewing the aerator by hand first. Turn it counterclockwise while looking up at the faucet tip. If it won't move, wrap the aerator with a soft cloth and use adjustable pliers with light pressure.
When it comes off, don't dump the parts into the sink. Set them on a towel in the order they came out. Many aerators include a screen, washer, housing, and sometimes a flow-control insert. If you reinstall them backwards, the faucet may still run poorly even though the parts are clean.
Soak, scrub, and rinse the right way
Manufacturer guidance supports a simple cleaning sequence: remove the aerator, soak it in vinegar or a citric-acid solution for 20 to 30 minutes for typical buildup, scrub gently with a soft brush, flush the faucet body before reinstalling, and avoid over-tightening during reassembly, as explained in Hansgrohe's kitchen faucet care tips.
That gives you a practical method:
- Light buildup can often be handled with a shorter soak and gentle brushing.
- Stubborn scale may need more soak time before the deposits loosen.
- Soft tools only work best on screens and finished parts.
If you already keep vinegar around for housework, this guide on cleaning your home with distilled vinegar gives a few other sensible uses for it beyond the faucet.
Don't use abrasive pads or aggressive acids on an aerator. They can damage screens, finishes, and seals faster than the mineral buildup did.
The step many DIY guides miss
Before you reinstall the clean aerator kitchen faucet assembly, turn on the faucet briefly with the aerator still off. That flushes out loose sediment sitting just behind the tip of the faucet.
This matters more than people think. If you skip the flush, the faucet can push loosened grit straight back into the screen you just cleaned. Then it feels like the repair didn't work, when really the debris came right back.
A simple sequence works well:
- Remove and disassemble the aerator carefully.
- Soak the pieces until buildup softens.
- Brush and rinse each part.
- Flush the open faucet body briefly into the sink.
- Reassemble by hand and snug it gently.
Reinstall it gently and test the stream
Thread the aerator back on by hand first so you don't cross-thread it. If you need pliers for the final snug, use the cloth again and stop short of cranking down hard. Over-tightening is a common mistake.
Once the water is back on, test for three things:
- A smooth stream
- No leaking around the threads
- No sideways spray or sputtering
If the stream looks normal again, you fixed the problem. If it still runs weak or erratic, the issue may not be the aerator alone.
Troubleshooting Low Water Pressure After Cleaning
If the aerator is clean and the flow is still weak, stop cleaning the same part over and over. At that point, the job shifts from scrubbing to diagnosis. You need to figure out whether the restriction is in the aerator, inside the faucet, on the supply side, or farther out in the plumbing system.

The aerator may need replacement, not another cleaning
I run into this a lot. A homeowner cleans the screen well, puts it back together, and expects full pressure to return. Sometimes that part is worn out.
Aerators are inexpensive, and replacement is often the faster fix when the part is physically damaged or packed with buildup that will not clear out of the mesh. Replace it if you see:
- Torn or bent screen material
- Heavy mineral scale stuck in the openings
- Corrosion on the housing or threads
- A spray pattern that stays uneven after proper cleaning
A fresh aerator is a sensible next step when the old one is beyond saving. It also helps rule out the faucet tip before you spend time chasing a bigger issue.
Check for restrictions inside the faucet
A weak stream after cleaning often means the clog is not at the tip anymore. On many pull-down faucets and filtered faucet setups, sediment gets trapped in small screens, check valves, or in-line filters inside the faucet body or supply connection. Moen covers some of those hidden restriction points in its aerator and filter troubleshooting information.
This is common in North Metro Atlanta homes with older galvanized piping, active construction nearby, or hard water that breaks loose scale over time.
A faucet can have more than one screen. If you only clean the visible one, you may miss the actual blockage.
If your kitchen faucet still runs weak, check these areas next:
- Supply line connections under the sink
- Shutoff valves that are not fully open
- Internal faucet screens or filters
- Pull-down spray head passages
- Kinked or twisted faucet hoses
If buildup keeps showing up in faucet parts, the water itself may be part of the problem. A whole-home system like HALO water filtration for your home can reduce the sediment and mineral debris that keeps clogging fixture screens.
Pay attention to what the rest of the house is doing
One weak kitchen faucet usually points to a local issue. Multiple weak fixtures point somewhere else.
That distinction matters.
If the bathroom sink, shower, and hose bibb all seem normal, stay focused on the kitchen faucet assembly and its supply lines. If low pressure shows up in several places, or if pressure drops at certain times of day, start thinking about supply problems, failing valves, a pressure-reducing valve issue, or a leak on the main line.
I also tell homeowners to watch for symptoms that should not be grouped in with a simple faucet cleaning job:
- Low pressure at more than one fixture
- Water that surges, spits, or pulses
- Discolored water from several taps
- Wet spots in the yard
- Slow drains happening at the same time
- Sewer odor near sinks, tubs, or floor drains
When low water pressure shows up alongside drainage problems, you may be dealing with two separate plumbing issues or one larger system problem. That is where drain cleaning, sewer repair, or main water line repair enters the conversation.
Use a quick process of elimination
A simple test can save a lot of guesswork. Remove the aerator again and run the faucet briefly. If pressure is strong with the aerator off but weak with it on, the tip assembly is still the problem. If pressure stays weak with the aerator off, move downstream and check the faucet internals and supply stops under the sink.
Here is a practical guide:
| What you see | Most likely next move |
|---|---|
| One kitchen faucet runs weak | Check supply stops, faucet screens, hose, and spray head |
| Strong flow without the aerator, weak flow with it | Replace the aerator |
| Several fixtures have low pressure | Investigate house pressure, valves, or water line issues |
| Low pressure plus drain or sewer symptoms | Call a plumber for a full diagnosis |
Water quality also affects how often these issues come back. If you are trying to improve water quality for coffee, you are already looking at one of the same root causes that clogs faucet screens. Sediment and mineral content do not just change taste. They create repeat maintenance problems all over the house.
A clean aerator is still a useful first check. It helps separate a small fixture repair from a bigger plumbing problem that needs professional testing and repair.
Proactive Maintenance and Preventing Future Clogs
The easiest faucet repair is the one you don't have to make twice. If your aerator clogs over and over, the answer usually isn't more scrubbing. The answer is reducing what keeps collecting there.
Cleaning the aerator helps with flow, but it also helps prevent bacteria buildup, and recurring clogs in hard water areas can signal the need for a broader solution such as a newer low-flow aerator or whole-home water treatment, according to CLR's guidance on cleaning a sink aerator.
A maintenance routine that actually works
For most homes, a simple habit works better than waiting for the faucet to act up:
- Check the stream regularly if spray starts breaking sideways or getting uneven
- Clean on a schedule instead of only after flow gets bad
- Replace worn aerators when the screen or housing doesn't clean up well
- Watch other fixtures for the same buildup pattern
In hard water areas, scale doesn't stay politely inside one faucet. It shows up on shower heads, sink spouts, appliance connections, and sometimes as a steady pattern of white crust around fixtures.
When a broader water solution makes sense
If you're repeatedly cleaning faucets in Roswell, Woodstock, or Johns Creek, the root issue may be the water itself. A whole-home filter or treatment setup can reduce the material that keeps clogging screens and coating fixtures. For homeowners comparing longer-term options, HALO whole-home water filtration systems are one example of a plumbing upgrade designed to improve water quality and protect fixtures throughout the house.
If water quality matters to how your kitchen performs day to day, it also affects what you drink and cook with. This short article on how to improve water quality for coffee is useful because it connects taste problems to the same water issues that often show up first at the faucet.
When DIY Is Not Enough Call JMJ Plumbing
You clean the aerator, turn the faucet back on, and the stream still spits, drops, or stays weak. At that point, the problem may not be at the faucet at all.

Cleaning or replacing an aerator is a solid homeowner fix because the part is easy to reach and cheap to swap. What matters is knowing when to stop. If the same symptom keeps coming back, or if more than one fixture is acting up, the restriction is often deeper in the system.
Here are the signs that call for a real diagnosis instead of another round of DIY:
- Low pressure at several fixtures instead of just the kitchen sink
- Discolored water from hot or cold taps
- Wet spots in the yard or signs of an outside water leak
- Slow drains, sewer odor, or backup
- A toilet that struggles to flush along with drain problems elsewhere
- A burst pipe or active leak that needs fast repair
I see this in North Metro Atlanta homes all the time. A faucet complaint starts at the kitchen sink, but the actual problem turns out to be a partially closed valve, debris in the supply line, a failing pressure regulator, a drain blockage affecting other fixtures, or a damaged main water line. An aerator can catch sediment, but it cannot fix what keeps sending that sediment downstream.
Professional diagnosis saves time because it narrows the problem fast. If the issue is isolated to the faucet, the repair stays small. If the issue points to main water line repair in Acworth, drain cleaning in Canton, sewer repair in Marietta, leak repair in Woodstock, or water line replacement near Alpharetta, you want that identified early before water damage or repeated clogs make the job bigger.
Surface clues can also send homeowners in the wrong direction. Hard-water spotting around the sink may look like a simple cleaning issue, but repeated spotting plus recurring faucet clogs often point to water quality or mineral buildup throughout the house. If you are sorting out what is cosmetic and what suggests a broader plumbing issue, these methods for tackling water stains are a useful reference.
If the faucet fix did not hold, or the problem affects more than one part of the house, book a licensed plumbing inspection online. JMJ Plumbing handles the bigger issues behind low flow, including leak detection, drain cleaning, sewer repair, water line work, and after-hours plumbing calls across North Metro Atlanta.