How to Fix a Leaking Faucet Hose: A 2026 DIY Guide
You hear the drip first. Then you open the cabinet and find the small puddle, the damp cleaner bottle, and that unmistakable line of water running down a hose under the sink.
Most faucet hose leaks start that way. They look minor. They rarely stay minor.
A leaking faucet hose can come from a braided supply line, a pull-out sprayer hose, or a side sprayer hose. The fix depends on which one is failing and exactly where the water is escaping. If you misread the source, you can replace the wrong part, tighten the wrong fitting, and still end up with water under the sink by dinner.
That Drip Under the Sink Is More Than an Annoyance
A lot of homeowners in Acworth wait on this repair because the leak seems manageable. Put a towel down. Empty the cabinet. Deal with it later.
That delay costs more than is often realized. The EPA estimates that a faucet dripping just 10 times per minute can waste over 3,000 gallons of water annually, and unaddressed leaks in 10% of American homes waste 90 gallons or more each day, often raising water bills by 10 to 20% according to Home Depot's faucet leak guide.
Under a kitchen sink, the bigger problem is often cabinet damage, swollen particleboard, mildew smell, and a shutoff valve that gets ignored until it’s suddenly urgent. If the leak is active and you can’t stop it quickly, treat it like a plumbing emergency and use JMJ Plumbing's emergency plumbing service instead of waiting for the damage to spread.
Know which hose you’re dealing with
Most homeowners are looking at one of these:
- Braided supply line. This is the metal-braided hose that connects the shutoff valve to the faucet body.
- Pull-out or pull-down sprayer hose. This is the flexible hose attached to the spray head on a kitchen faucet.
- Side sprayer hose. This is the smaller hose running to a separate handheld sprayer beside the main faucet.
Each one fails differently. A supply line usually leaks at the nut, washer, or crimped end. A sprayer hose often leaks from the hose body, the spray head connection, or the quick-connect fitting.
Practical rule: If the cabinet is wet but the faucet top looks dry, don’t assume the leak is “just condensation.” Track it before you buy parts.
If you’re buying or selling a home, this kind of small plumbing issue is exactly the sort of thing that shows up during a walkthrough or pre-sale check. It’s also why many homeowners review resources like Learn about Home Inspections to understand how minor defects can point to bigger maintenance patterns.
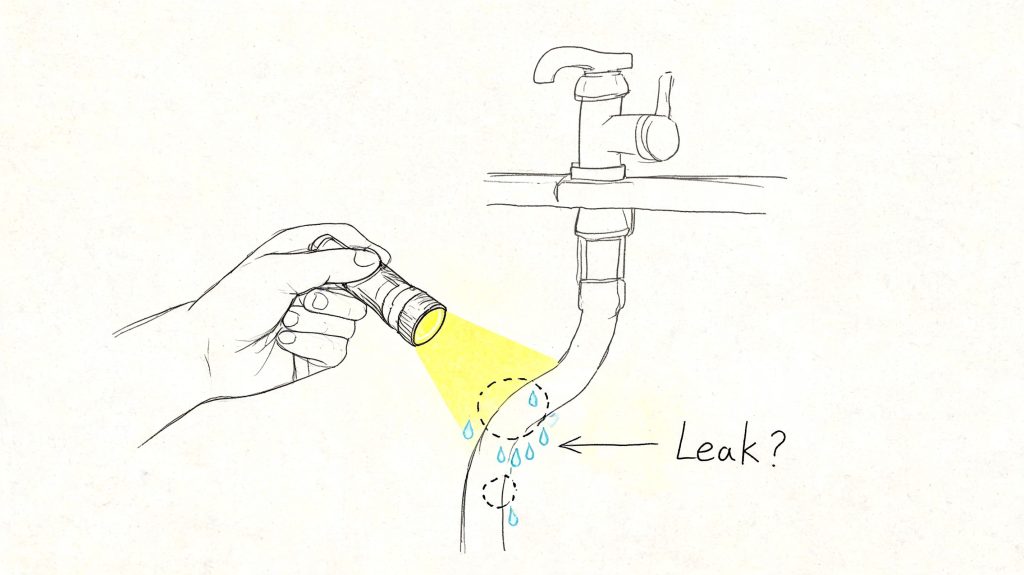
Pinpointing the Exact Location of the Leak
Before you loosen anything, find the leak. That sounds obvious, but it’s where most DIY repairs go off course.
Professional diagnosis usually starts with two main failure points: the connection nut and the spout or hose body. Worn internal washers or gaskets cause about 80% of leaks at connection points, and a common DIY mistake is fixing the connection when the hose itself has a pinhole leak, as shown in this hose faucet repair video.
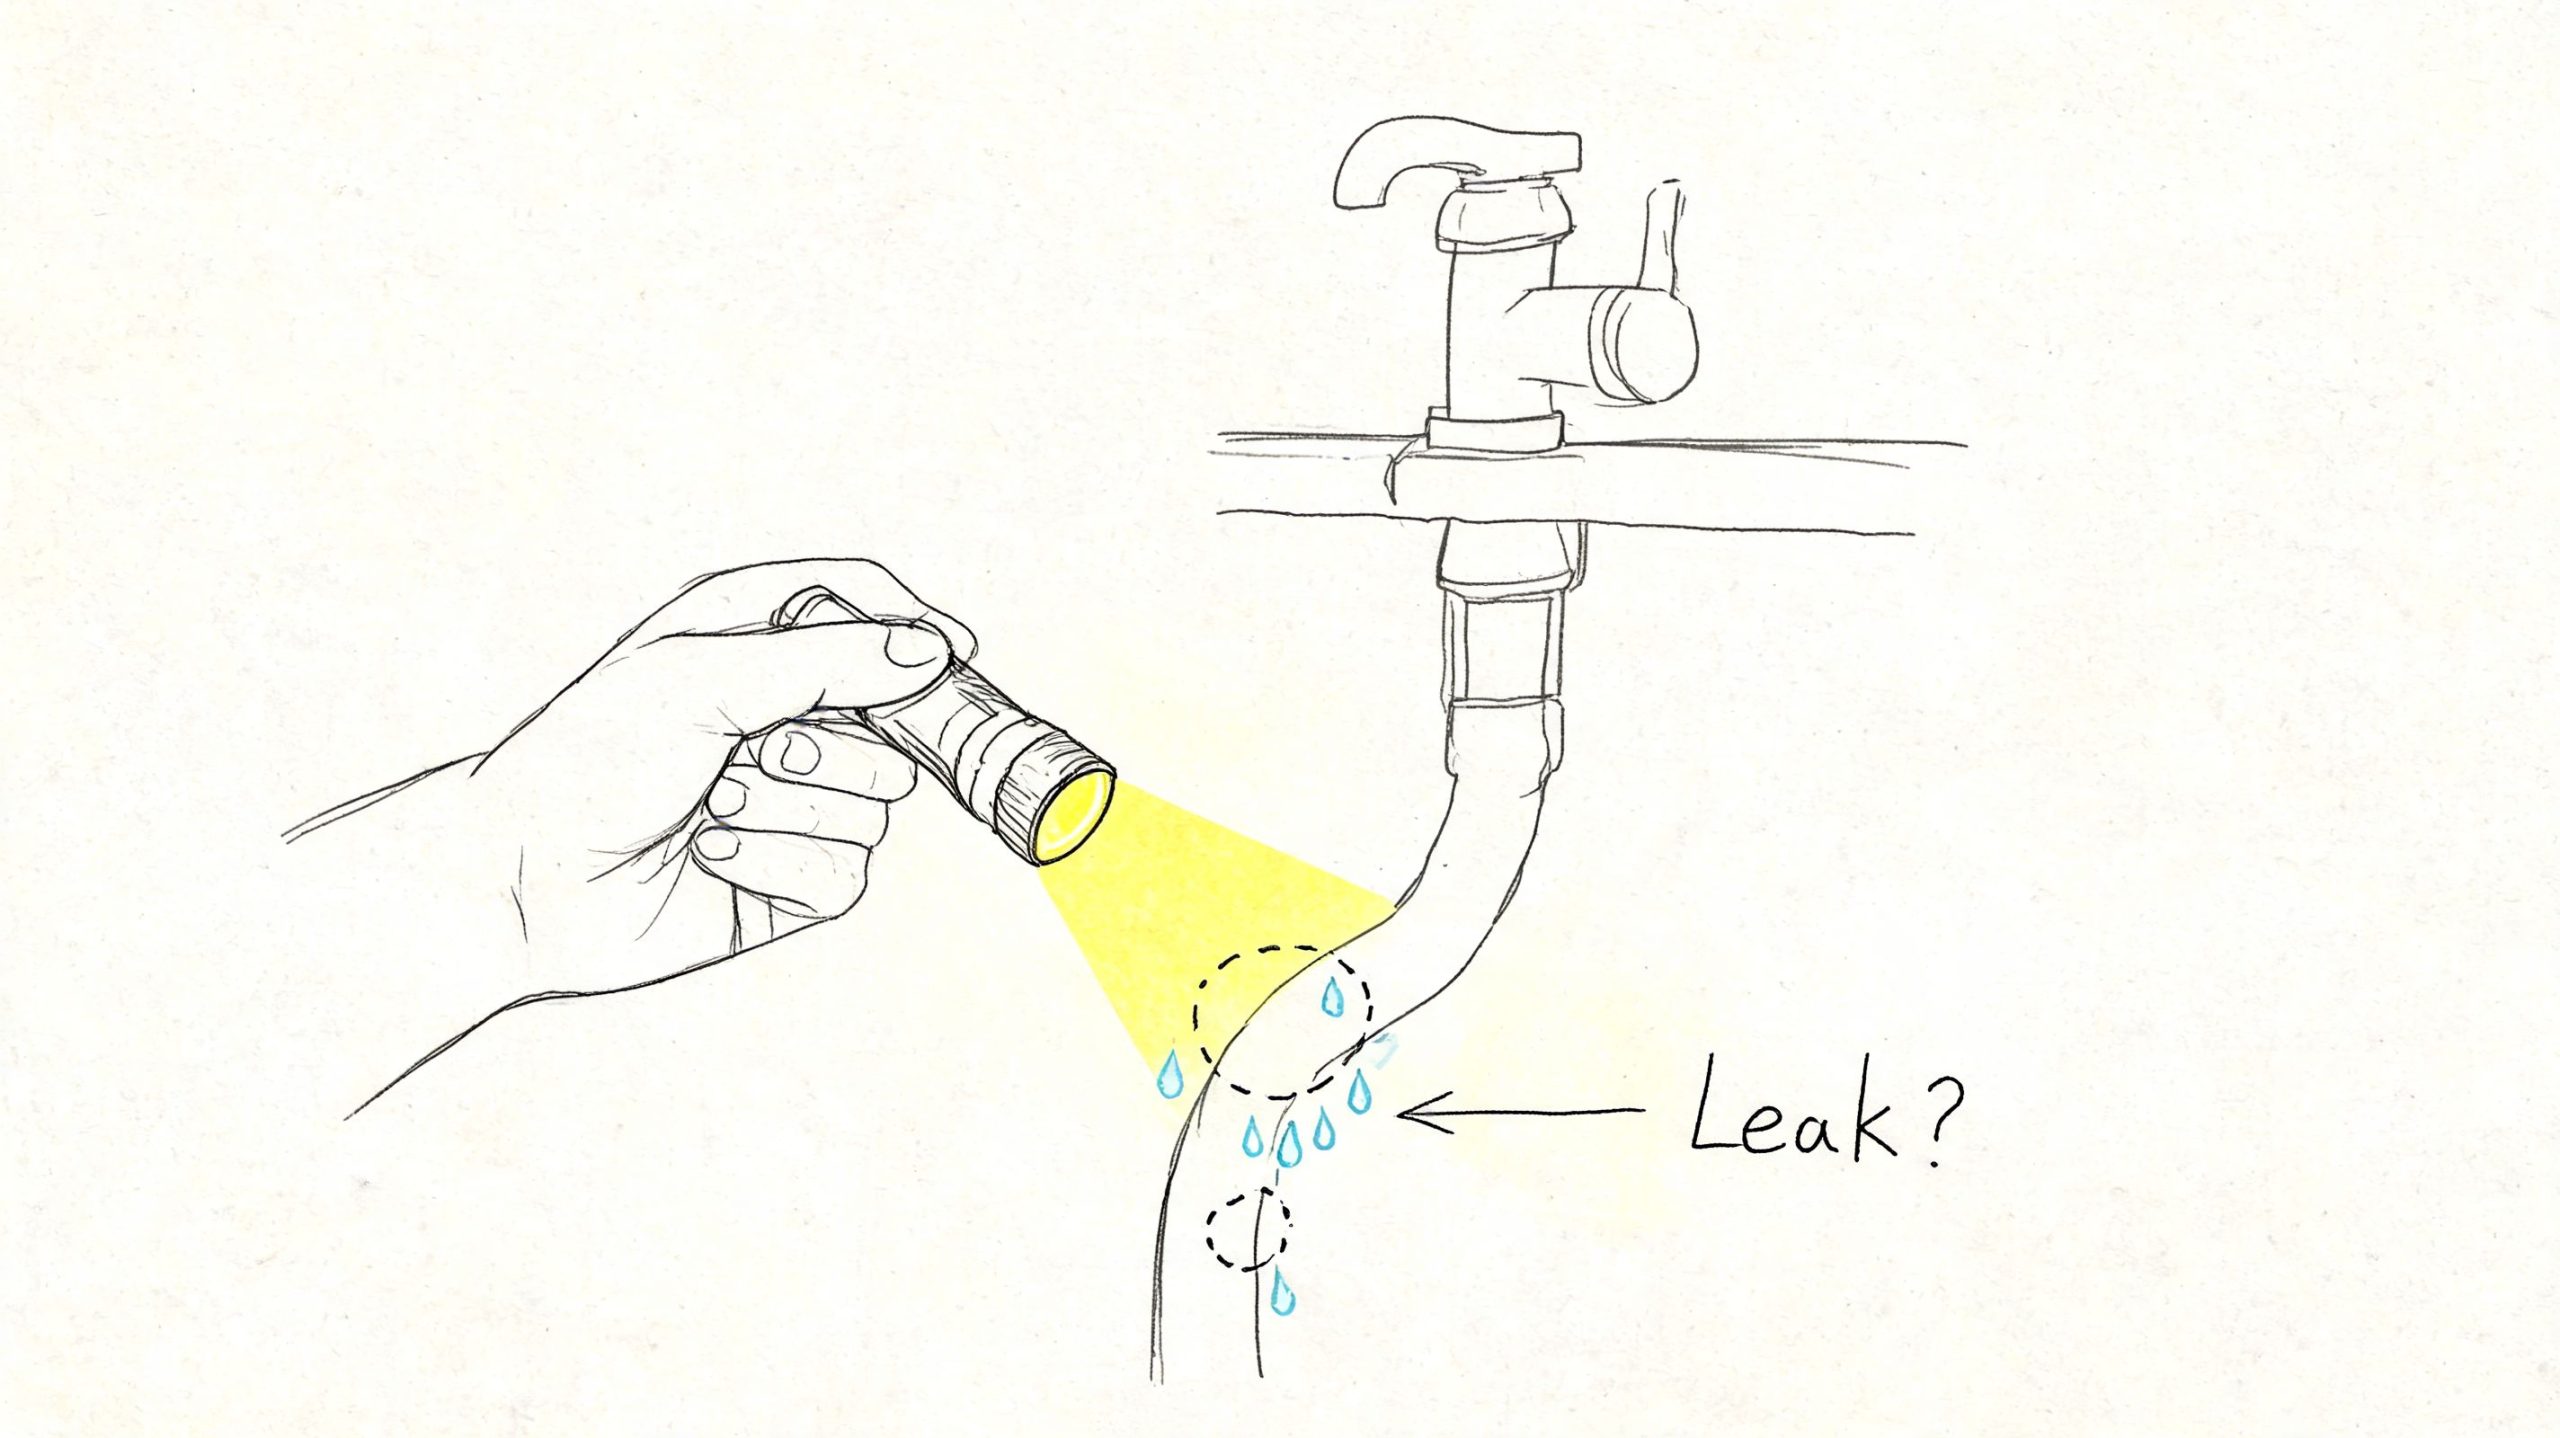
Start with a dry test
Wipe everything dry first. Not damp. Completely dry.
Use a rag on the shutoff valves, supply lines, faucet body, hose loops, sprayer connection, and the cabinet floor. Then place a dry paper towel under each suspected area and run the faucet for a short test.
Paper towels make small leaks easier to trace because they show the first point of moisture fast.
Follow this inspection order
Use a flashlight and check in this sequence:
-
The shutoff valve connection
Look where the hose nut meets the valve. If water appears there first, the issue may be a loose nut, damaged gasket, or worn supply line end. -
The upper faucet connection
Check where the hose meets the underside of the faucet. This is a common spot for drips that travel down the hose and fool you into thinking the lower end is leaking. -
The hose body itself
Flex the hose gently and look for tiny spray points, cracks, or bulges. Braided hoses can hide internal failure until water seeps through the braid. -
The sprayer or pull-down head connection
Run water both hot and cold. Switch between stream and spray if your faucet has that option. Some leaks only show under active spray pressure. -
The quick-connect fitting
Many pull-down faucets have a plastic quick-connect under the sink. If that fitting is partly seated or the internal seal has failed, you’ll often see dripping during faucet use, not when the faucet is off.
If the leak only happens while the faucet is running, focus on the hose body, sprayer line, and quick-connects. If it drips even when the faucet is off, look harder at supply lines and faucet internals.
Don’t miss the false leak
Water travels. That’s why the wet spot on the cabinet floor is the least useful clue.
A drip from the faucet base can run down a supply line. A leak at the sprayer head can follow the hose loop and show up near the shutoff valve. I’ve seen homeowners replace a perfectly good braided line because the lowest visible drip was at the valve.
Check the highest wet point, not the lowest.
Signs that point to replacement instead of tightening
Some leaks respond to a snug connection. Some don’t. Replace the hose if you find any of these:
- Visible bulging in a braided line
- Fraying or kinking along the hose
- Pinhole spraying from the hose wall
- Cracked plastic fittings
- Repeated leaking after retightening
If you only tighten a failing hose, you usually buy yourself a short delay, not a real repair.
Gathering Your Tools and Replacement Parts
A smooth repair starts before you crawl under the sink. The right tools save time, and the right replacement part keeps you from making a second trip to the hardware store.
For most homeowners, this job is straightforward if the shutoff valves work, the fittings aren’t seized, and the faucet uses common connections. Tight spaces under kitchen and bathroom sinks are what slow people down.
What to have on hand
Here’s a practical checklist to set up before you start.
| Item | Purpose | Pro Tip |
|---|---|---|
| Adjustable wrench | Loosens and tightens metal nuts on supply lines | Hold the valve body steady with your free hand so you don’t twist the valve |
| Basin wrench | Reaches faucet connections tucked behind the sink bowl | Worth bringing if your faucet connection is hard to see or reach |
| Channel-lock pliers | Helps with stubborn fittings | Use gently on plated parts to avoid chewing up the finish |
| Flashlight or headlamp | Lets you inspect the back side of hoses and fittings | A headlamp keeps both hands free |
| Bucket or shallow pan | Catches leftover water when disconnecting the hose | Even with valves off, a little water will spill |
| Dry rags or paper towels | Confirms where the leak begins and helps with cleanup | Keep one dry towel just for leak testing |
| Replacement hose | Swaps out the failed supply or sprayer hose | Match length, connection type, and brand compatibility |
| Replacement washers or gaskets | Fixes leaks at connection points when the hose is still serviceable | Bring the old washer to the store if possible |
| Plumber’s tape | Useful on some threaded connections | Don’t use it where a rubber gasket does the sealing |
How to choose the right hose
Bring the old part with you if you can. That’s the easiest way to match thread size, nut style, hose length, and any quick-connect design.
For a braided supply line, compare:
- Connection size
- Nut type
- Overall length
- Whether the old line has built-in washers
For a pull-out sprayer hose, compare:
- Brand compatibility
- Quick-connect shape
- Weight attachment setup
- Hose routing under the sink
Store-counter advice: “Universal” parts can work, but faucet sprayer systems are often pickier than supply lines. If the connection looks close but not exact, keep looking.
Parts that cause the most confusion
Homeowners in Woodstock, Cumming, and Johns Creek run into the same trouble. They buy a hose that’s almost right.
Watch for these mismatches:
- Too short. The hose reaches, but it stays under tension and fails early.
- Wrong quick-connect. It snaps in halfway and leaks during use.
- Missing gasket. The threads fit, but the connection never seals.
- Plastic-to-metal over-tightening risk. The nut goes on, but cracks if forced.
Set everything out before you begin. Once the water is off, you don’t want to discover you’re missing one small gasket.
The Complete Process for Replacing a Leaky Faucet Hose
Once you’ve confirmed the hose is the problem, the repair is mostly about staying organized and not forcing anything. The fastest jobs usually happen when the old hose comes out clean and the new one goes in without cross-threading or twisting.
If you want another homeowner-friendly reference after this walkthrough, All Well Property Services' maintenance guide is a useful companion read. If the faucet itself is aging, leaking at multiple points, or due for an upgrade, a professional faucet repair and replacement service may make more sense than replacing one hose at a time.
Shut off the water and clear the line
Turn off the local shutoff valves under the sink. Then open the faucet to relieve pressure and drain what’s left in the line.
Put a bucket under the work area. Even a fully shut valve leaves a little water inside the hose.
If a shutoff valve won’t turn, don’t muscle it. A stuck valve can turn a faucet hose repair into a much bigger leak.
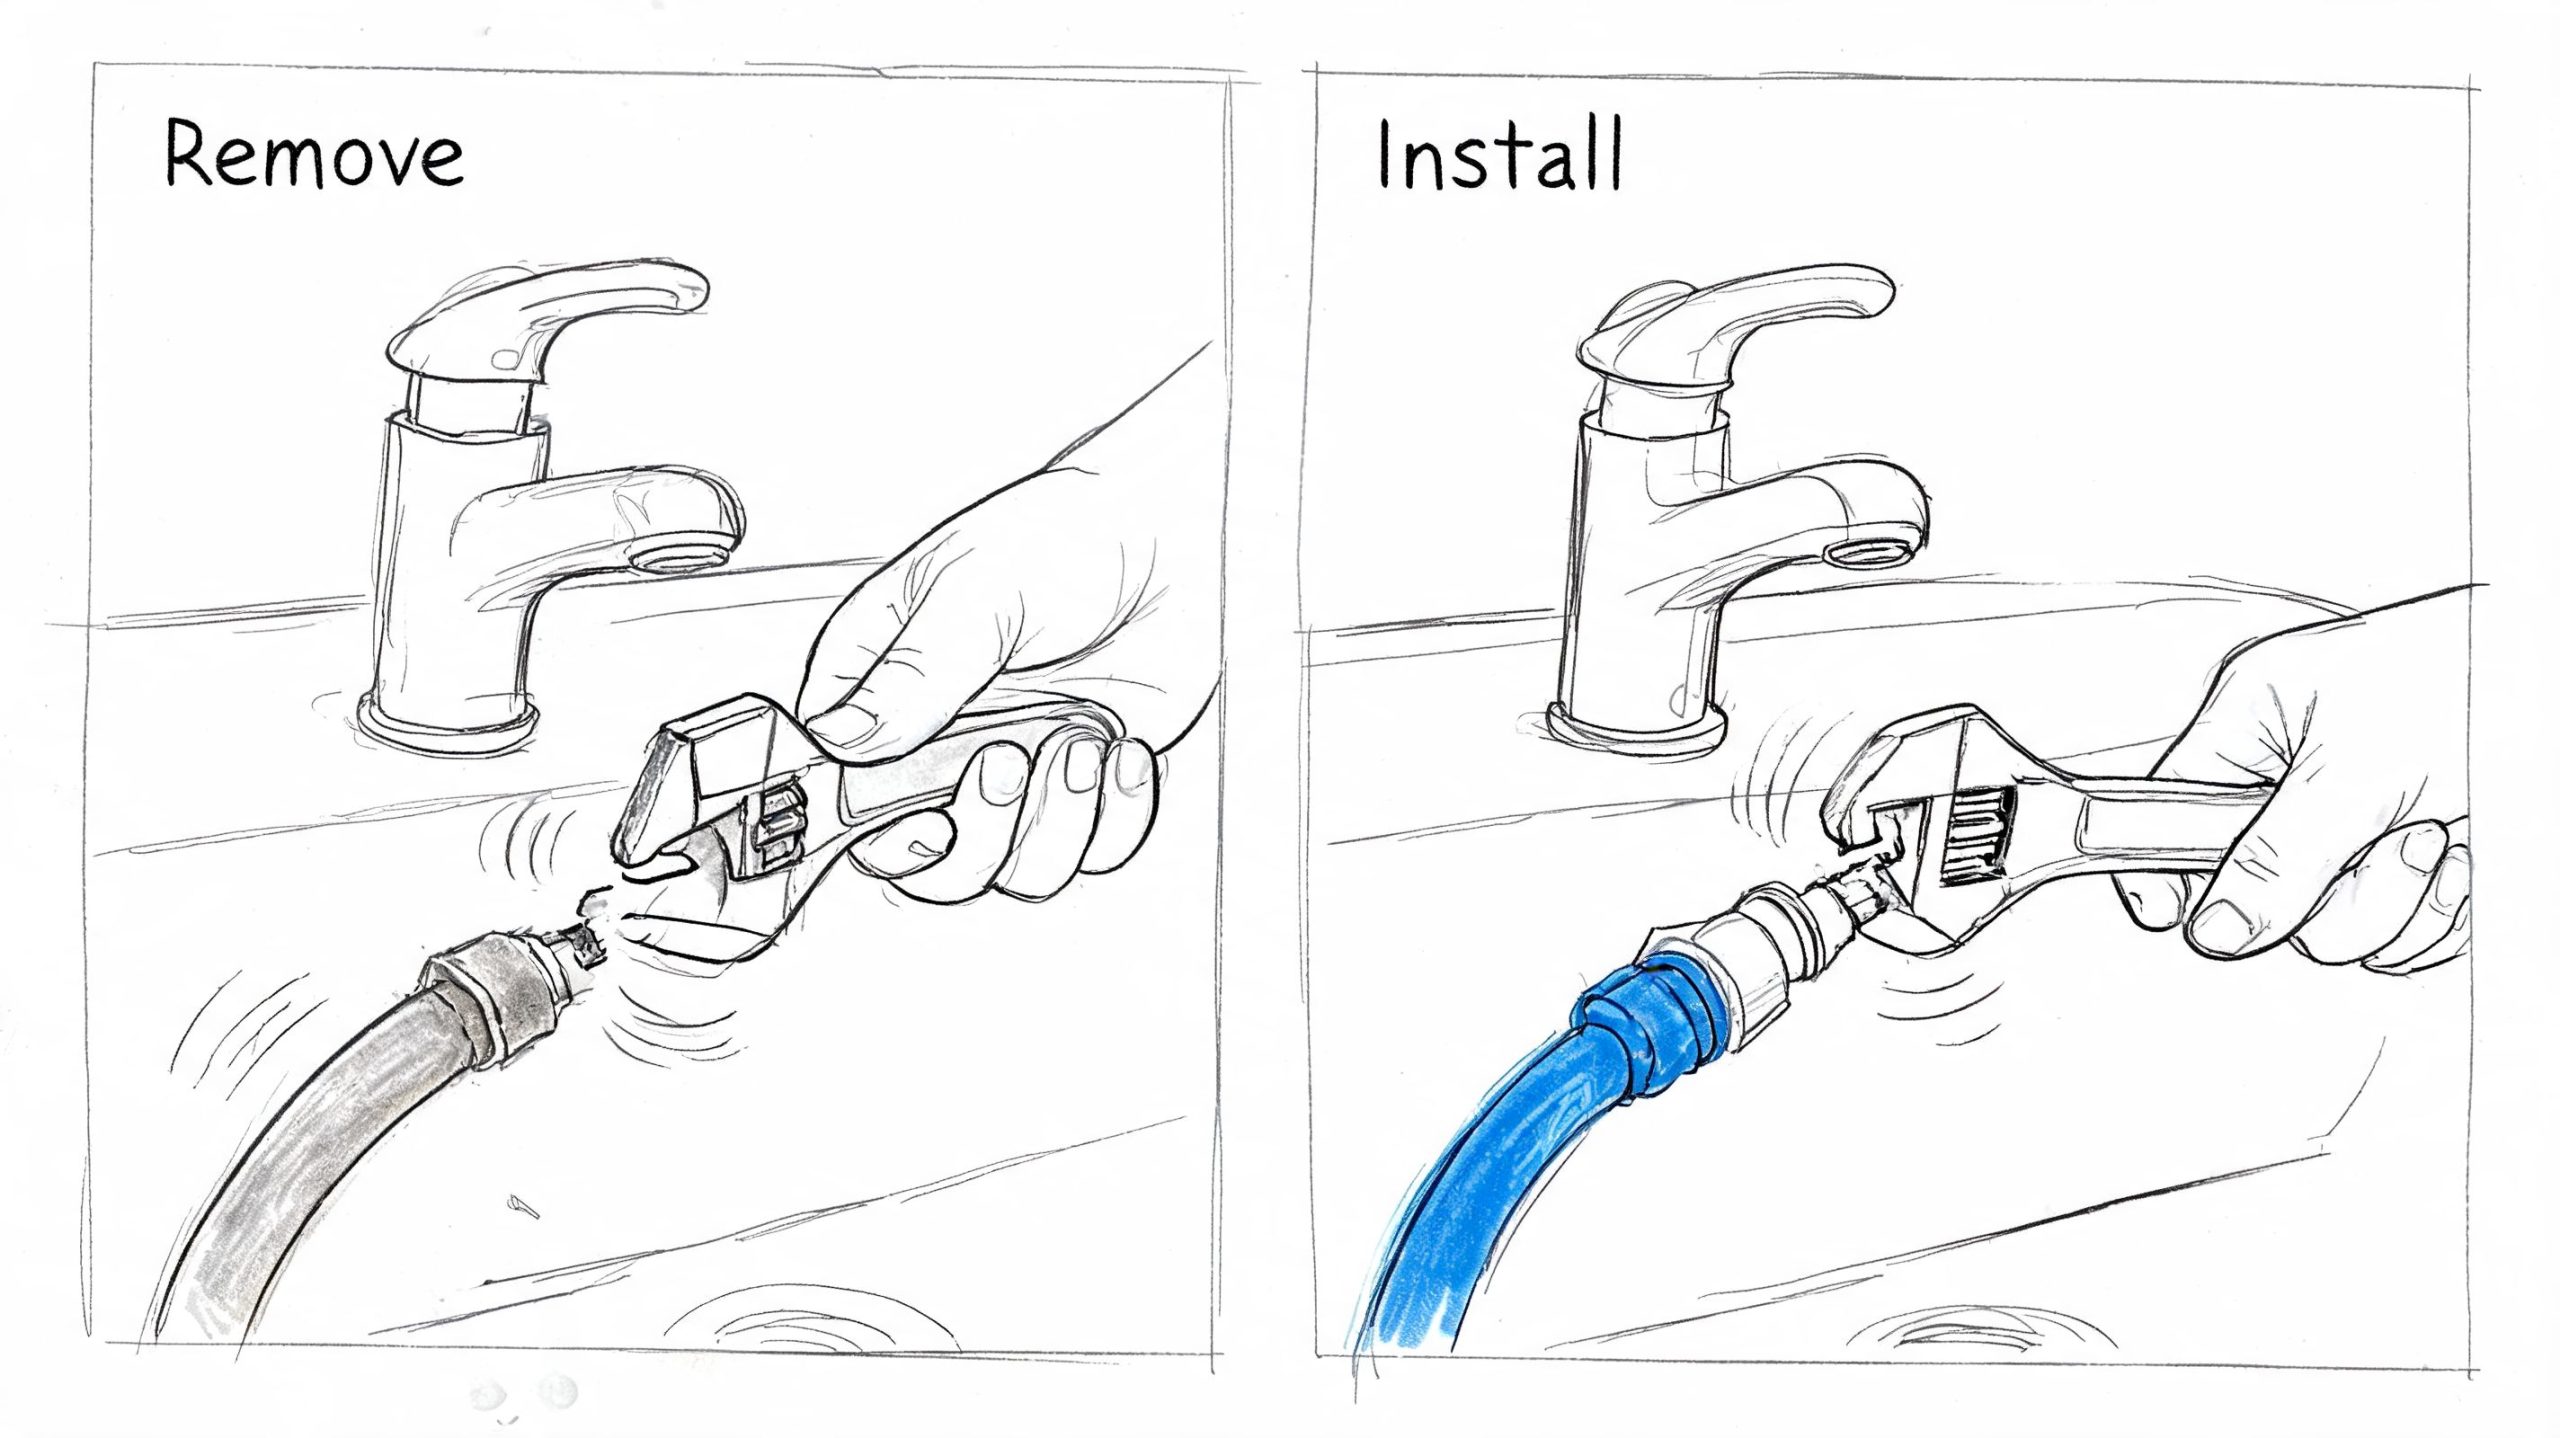
Remove the old hose carefully
For a braided supply line, loosen the lower nut at the shutoff valve first, then the upper nut at the faucet. Use one wrench to turn the nut and, if needed, steady the mating part with the other hand.
For a pull-out or side sprayer hose, disconnect the quick-connect or threaded fitting under the sink, then feed the hose down or up depending on the faucet design. If there’s a weight clipped to the hose, note its position before removing it.
A few practical points matter here:
- Don’t yank a sprayer hose. It may be routed through a guide sleeve.
- Don’t reuse a crushed gasket if the new hose includes a fresh one.
- Don’t assume tighter is better on plastic fittings.
Check the mating surfaces before installation
This is the part people skip. It matters.
Look at the valve outlet, faucet shank, sprayer port, or quick-connect receiver. Wipe away any grit, scale, or old gasket residue. A new hose won’t seal well against a dirty or damaged surface.
If you see obvious corrosion, cracked plastic, or a distorted receiving thread, the hose may not be the only failed part.
A clean connection surface does more for leak prevention than brute force on a wrench.
Install the new hose without twisting it
Start all threaded connections by hand. If the nut doesn’t turn easily for the first few threads, back it off and try again.
That resistance usually means cross-threading, and cross-threading ruins fittings fast. Once the nut is hand-tight and seated correctly, finish with the wrench until snug.
For pull-down sprayer hoses, route the hose exactly as the old one ran. Reattach any weight at the same position so the spray head retracts properly and the hose doesn’t rub against storage items or sharp cabinet edges.
Here’s what works and what doesn’t:
- Works. Hand-thread first, then snug with a wrench.
- Doesn’t work. Starting with pliers because the space is awkward.
- Works. Using the gasket supplied with the hose when the fitting is designed for gasket sealing.
- Doesn’t work. Wrapping plumber’s tape on every connection without checking how that joint seals.
- Works. Keeping a gentle curve in the hose.
- Doesn’t work. Installing the line with a twist that fights the fitting.
Test in stages, not all at once
Turn the shutoff valves back on slowly. Don’t stuff everything back into the cabinet yet.
First, watch the lower connection. Then dry it and check the upper connection. After that, run the faucet and inspect the hose under pressure. If it’s a sprayer hose, pull the spray head out fully and run both stream and spray settings while watching the hose loop below.
Use a dry paper towel around each fitting. It finds a small seep faster than your eyes will.
If it still leaks after replacement
Stop and identify where it’s leaking now.
If the new leak is at the nut, the usual causes are:
- the gasket is missing or out of place
- the fitting is cross-threaded
- the mating surface is damaged
- the nut needs a slight additional tightening
If the new leak is from the hose body, you may have a defective part or a sharp edge under the sink cutting into it. If the leak appears somewhere new, the original diagnosis may have missed a second failure point.
A successful faucet hose repair leaves the cabinet dry after repeated use, not just for the first minute after installation.
Understanding Why Your Faucet Hose Keeps Leaking
Some homes seem to burn through faucet hoses, washers, and sprayer seals faster than others. That isn’t always bad luck.
In many North Metro Atlanta communities, including parts of Acworth, Canton, Marietta, and Alpharetta, moderately hard water contributes to recurring wear. Mineral deposits can make rubber and plastic components brittle and fail prematurely, and addressing the underlying water hardness can help prevent repeat failures across fixtures, as explained in this water quality and plumbing component overview.
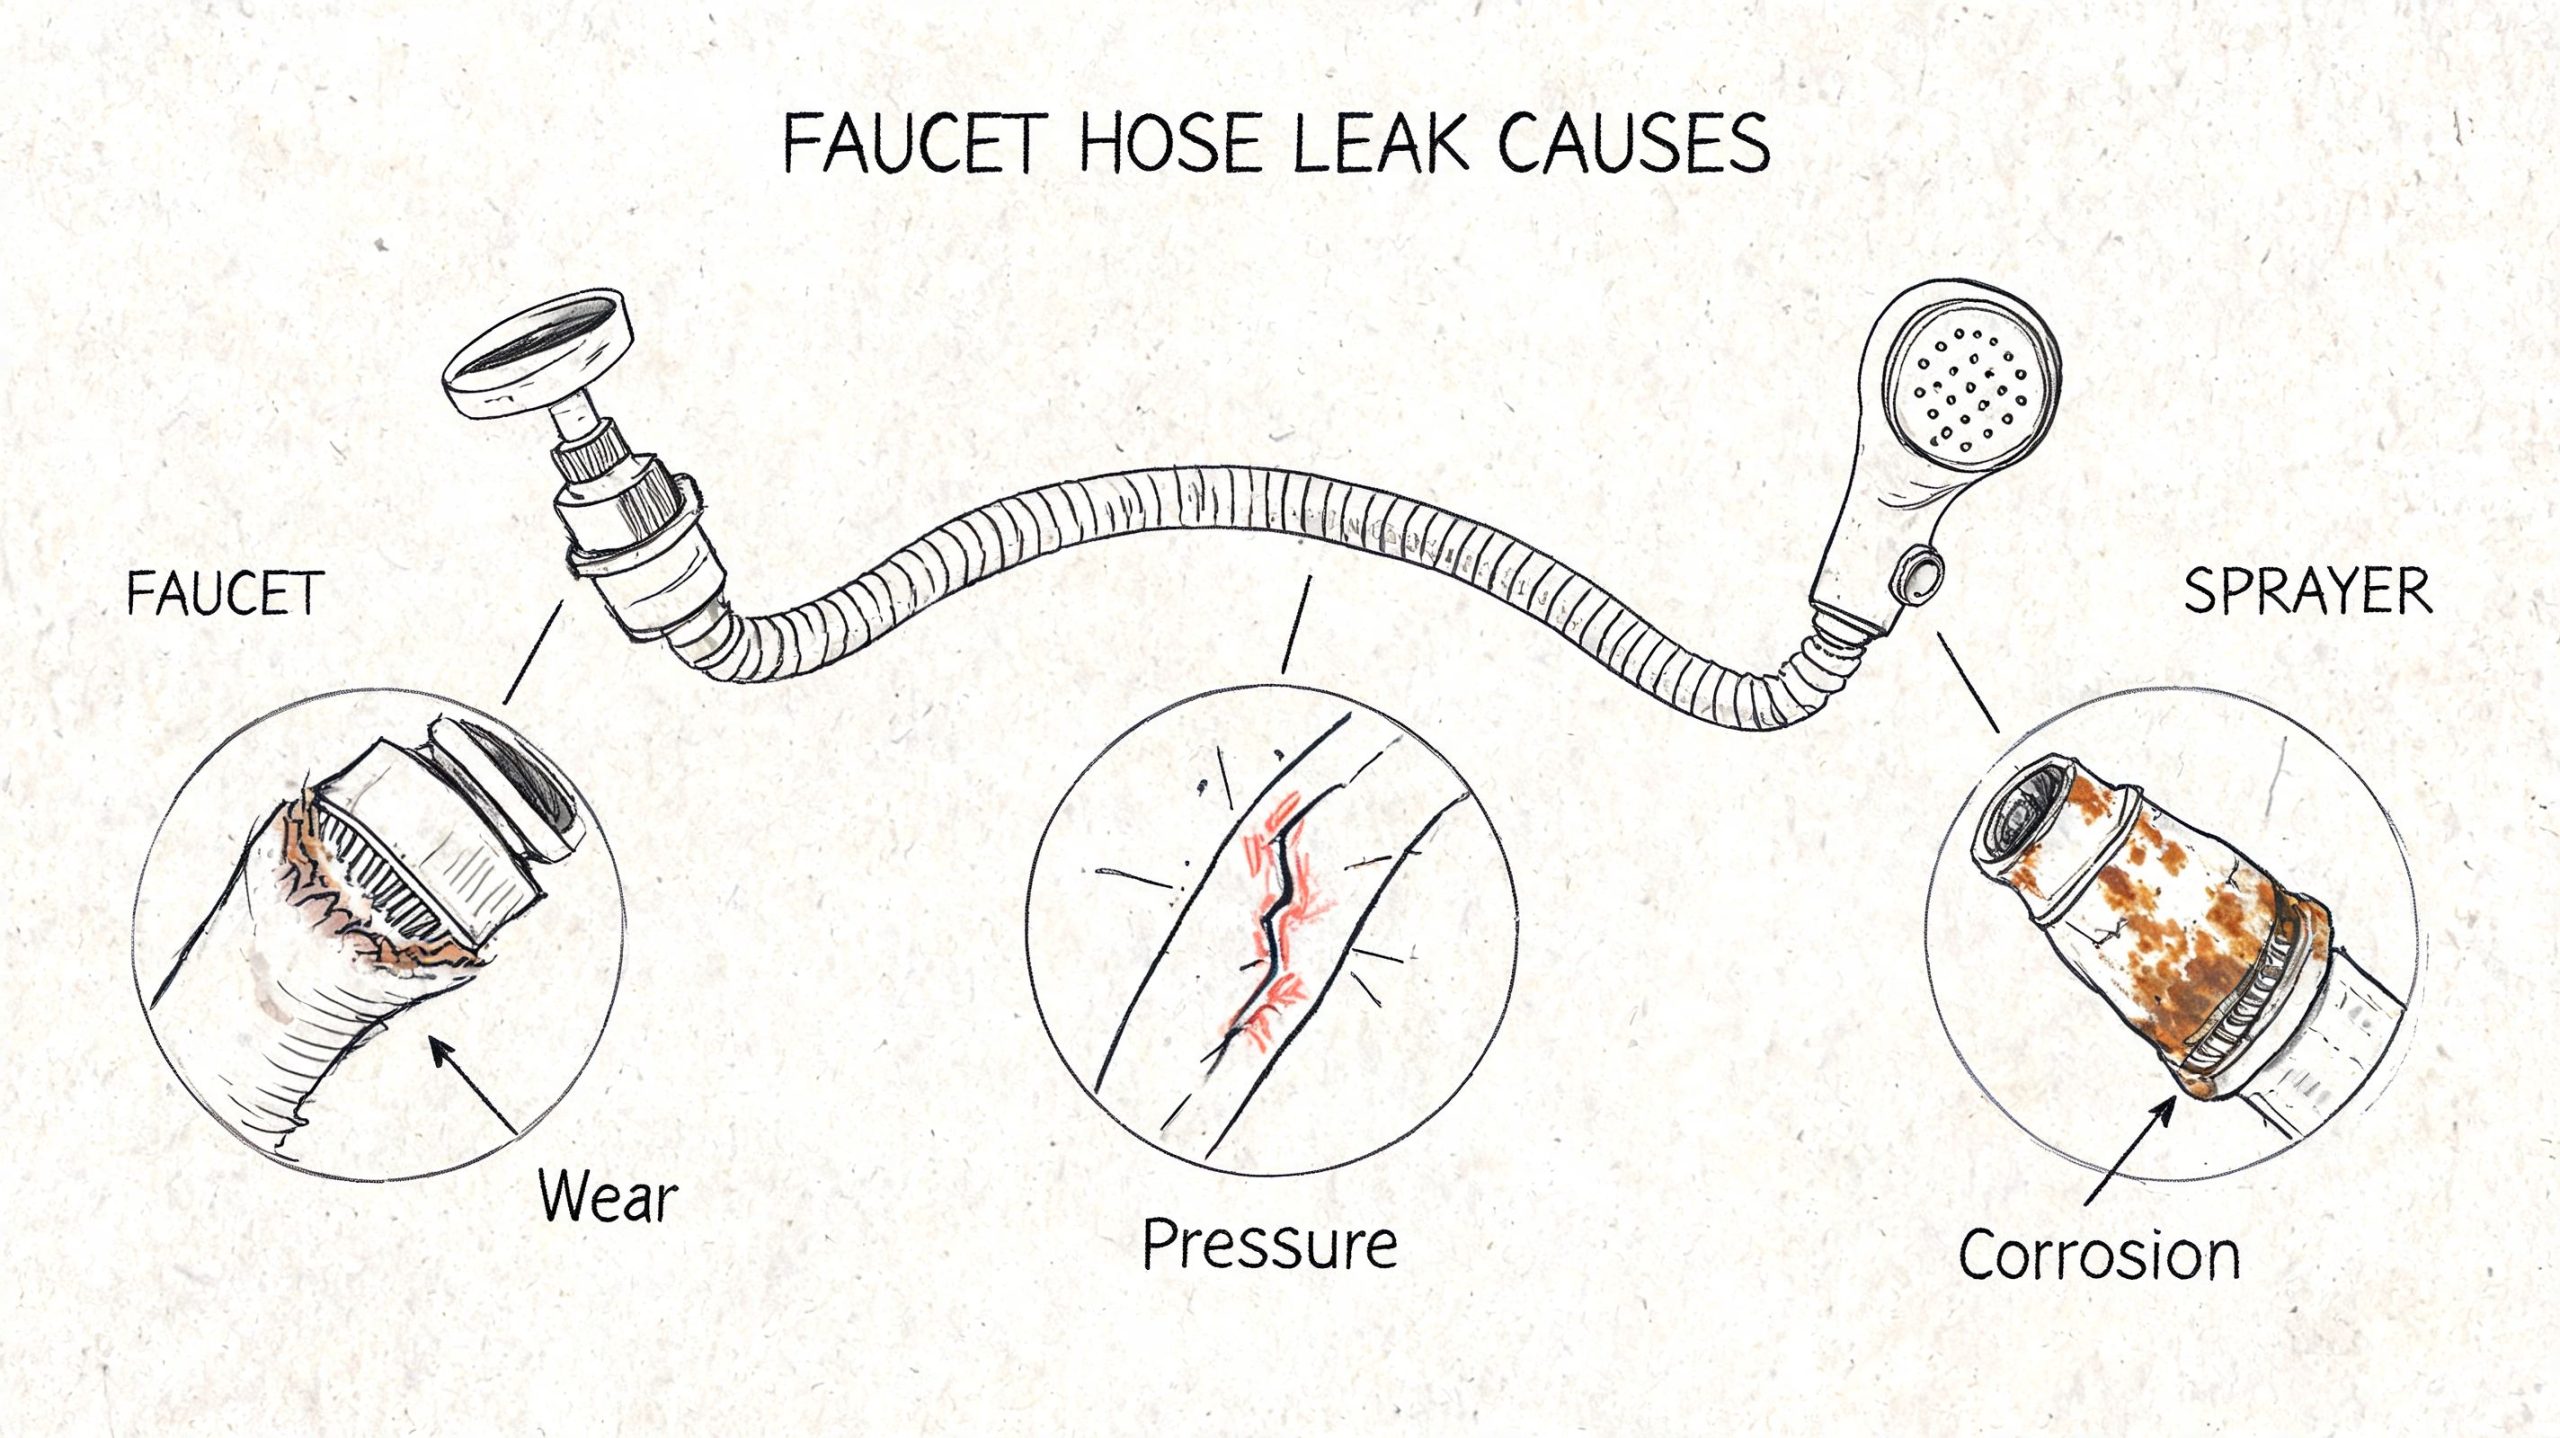
What hard water does inside a hose connection
Hard water leaves mineral scale behind. Over time, that buildup changes how fittings seat and how rubber gaskets compress.
A washer that should flex and seal can stiffen instead. A sprayer connection that should close evenly can develop tiny gaps. On braided lines, mineral activity around fittings can make future removal harder and can hide early signs of deterioration.
Why your repair may not last
A hose replacement can be correct and still not be the final answer if the underlying conditions stay the same.
Look at the pattern:
- Repeated gasket failure suggests the seal material is aging fast or being stressed by buildup.
- White or chalky residue around threads points to mineral deposits.
- Stiff sprayer hoses can mean internal wear and residue buildup are both in play.
- Leaks in more than one fixture suggest a house-wide water quality issue, not a single bad faucet.
When the same kind of leak keeps returning in different rooms, stop thinking fixture by fixture. Start thinking about the water moving through the whole house.
The broader plumbing impact
This matters beyond one kitchen sink. The same water that shortens the life of hose washers also moves through your shutoff valves, shower cartridges, toilet fill valves, water heater, and other fixtures.
That’s why some homeowners fix one leak, then start noticing low flow, rough valve action, or more frequent fixture repairs elsewhere. A long-term approach often includes checking overall water quality and deciding whether whole-home filtration makes sense for the house.
If you’ve replaced faucet hoses more than once and the fittings keep crusting up, the hose isn’t always the actual problem. Sometimes it’s the first visible symptom.
Know When to Call a JMJ Plumbing Professional
A leaking faucet hose is often a solid DIY job. It stops being a DIY job when the repair depends on a valve that won’t shut off, a fitting that’s fused in place, or damage that reaches beyond the hose.
That line matters. Homeowners usually save the most time and frustration by calling before a small repair turns into cabinet damage, drywall opening, or an after-hours water emergency.
Stop and call for help if you find any of these
- A shutoff valve that won’t close. If the valve keeps spinning, leaks at the stem, or won’t fully stop the water, don’t proceed under pressure.
- Heavy corrosion. Corroded faucet shanks, seized nuts, and mineral-locked fittings often break when forced.
- Cracked plastic parts. Once a faucet body or quick-connect housing cracks, replacing only the hose won’t solve it.
- Leaking inside the wall or countertop. Water showing up away from the visible hose can point to a larger supply or fixture issue.
- A failed repair. If the new hose is installed correctly and the leak remains, the problem may be the faucet, valve seat, or a hidden connection.
When the problem is bigger than the faucet
Homeowners searching for emergency plumber in Roswell, 24 hour plumber in Marietta, or leak repair near me often start with a faucet symptom and end up needing broader diagnosis.
That’s especially true when you notice any of these at the same time:
- Low water pressure
- Water stains below the sink or behind the cabinet
- Water in the yard
- A sudden sewage smell
- Slow drains or backup symptoms nearby
Those signs can overlap with other plumbing problems, including supply line issues, drain problems, or a need for professional leak detection. A small under-sink leak doesn’t cause every one of those symptoms, but it can be the clue that sends you looking in the right direction.
If you need to shut off the whole house just to change one hose, the house is telling you something about the condition of its plumbing system.
Local help matters on urgent jobs
In Acworth, Woodstock, Canton, Alpharetta, Johns Creek, and the rest of North Metro Atlanta, response time matters when water is active. If a hose bursts, a shutoff fails, or the cabinet is already flooding, booking help quickly is the right move.
For a fast service request, use the JMJ Plumbing booking page. That’s the smart next step when the repair leaves DIY territory and becomes a same-day plumbing problem.
Your Faucet Hose Repair Questions Answered
Can I fix a leaking faucet hose without replacing it
Sometimes. If the leak is at a connection and the hose itself is still sound, tightening the fitting or replacing the gasket may stop it. If the hose body is cracked, kinked, pinholed, or bulging, replace the hose.
Is plumber’s tape enough to stop the leak
Not usually. Tape helps on some threaded joints, but it doesn’t fix a split hose, a damaged gasket, or a cracked fitting. It also won’t help on connections designed to seal with a rubber washer.
Why does the hose still leak after I installed a new one
The most common reasons are a mis-seated gasket, cross-threaded nut, dirty mating surface, or a wrong replacement part. Sometimes the original diagnosis was off and the faucet body or sprayer head is instead leaking.
Should I replace both supply lines if only one is leaking
In many cases, that’s a reasonable call if both lines are the same age and show similar wear. It saves crawling back under the sink later. If one line is clearly newer and in good condition, replacing only the failed line can be fine.
What if I fix the hose and then notice low water pressure
Check whether a shutoff valve is fully reopened and whether debris reached the faucet aerator during the repair. If low pressure continues, the issue may be separate from the hose and may need a broader plumbing check.
Does this kind of leak relate to other plumbing problems in the house
It can. Recurring fixture leaks sometimes show up alongside aging shutoff valves, hard-water buildup, or other maintenance issues. If you’re also dealing with slow drains, a clogged toilet that won’t flush, or concerns about sewer backup, treat those as separate problems that deserve their own diagnosis rather than assuming one repair caused the other.
If your faucet hose leak won’t stop, the shutoff valve won’t cooperate, or you’d rather have the repair done cleanly the first time, JMJ Plumbing can help. Their licensed team serves Acworth and North Metro Atlanta with leak repair, emergency plumbing, fixture replacement, drain cleaning, sewer and water line work, and whole-home plumbing solutions when the problem turns out to be bigger than one hose.